

Step into the future of no-code automation! Explore our easy, beginner-friendly guide on using n8n Cloud, a workflow automation tool, for integrating OpenAI Vision API in your workflow automation process. Follow this tutorial to find out how to easily use OpenAI’s Vision API via n8n cloud to describe images.
How to Use the OpenAI Vision API
The Preparation
Setting Up your Open AI Account
In the first step, we need a charged OpenAI account with a corresponding API key to send requests to OpenAI. To open an account, simply click here. If you already have an account, you can skip directly to the next point.
Creating your Input
To feed the API of Open AI with an image we need it in a certain format because we cannot simply upload it via the API. We can either use images with the API via Base64 encoded format or an image URL.
In this tutorial, I have already shown how you can automatically create screenshots with n8n and the Urlbox API. Since the output of Urlbox is a URL with the hosted image, we will focus on the option via URL instead of base64 encoded images.
If you don’t want to use the Vision API with urlbox outputs, you can choose an image from the Internet for testing and select the exact domain for the resource for the image as input. In the long term, it makes the most sense to store your images via S3 file storage at a hoster such as AWS and then request them via URL.
You can find more information and additional examples on how to use the Visions API here.
Setting Up Your n8n workflow
To get started with our automation, we need a new workflow at n8n. If you already have an account, you should create a new workflow. You can later copy and paste the automation into every existing workflow you like it to be a part of.
If you are new to n8n I would recommend you to create a trial account and have a look at this tutorial on how to get started with n8n cloud.
After you have registered, you will be taken directly to your first, empty, workflow and can get started right away.
The API Request
To interact with external services at n8n there are basically 2 possibilities, either there is a native integration from the n8n side, or you can interact with REST APIs via the HTTP Request node custom. (In case you want to interact with a GraphQL API, there is an extra GraphQL Node, but we will not cover this today).
If you are new to APIs and HTTP Requests, I highly recommend having a look at this tutorial to get the basic knowledge you should have to follow further along.
Although there is a native integration for Open AI at n8n, this is not (yet) adapted to the special needs of the Vision Endpoint. We will therefore explain the option via the HTTP request node for this tutorial. If you would like to use a model other than the Vision model, you can find the tutorial for the native integration here.
To continue, create a new HTTP request node in your n8n workflow.

Input
If you don’t want to recreate the urlbox screenshot automation or simply want to test the vision API with a static URL, you can skip directly to the next point “Method & URL”.
Since we want to have a variable input in our prompt in our example with the screenshot that we created with urlbox, we now have to connect our HTTP request node that we created in this tutorial with our new one.
We will then see the output of the first node as the input of our second node and can simply use this data point as a variable later in the process.

This is what you now should see on the left side of your new HTTP Reuest node with which we will in the following steps create our OpenAI Vision API Request.
Method & URL
First we have to define which permitted operation we want to perform for which URL. In our case, we want to perform a post operation under the URL:
https://api.openai.com/v1/chat/completionsBasically, you can find out which operation and URL you need to use by looking at the API documentation. Here you can find the API documentation of OpenAI.
It is best to check whether, for example, the URL is still the same at the time you are reading this as it was at the time I wrote it.

This is how the top of your HTTP Request node should look like if you followed the steps.
In this case, authentication is not carried out via the built-in field, but via the header, as you will see in the next step.
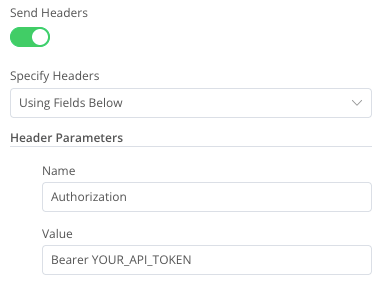
Header / Authentication
To add a header to our request, you must first activate “Send Header”.
As we only use the header for authentication in this case, we also use this as the Name for our parameter.
We now enter “Bearer” followed by our OpenAI API key as the value.
If you would use this workflow in production or share the workspace with other people, you should handle your developer secrets differently. In this case, however, we keep it as simple as possible for fast prototyping reasons.
Body
We now use the body of our request to define the model and specify our prompt. To do this, we must first activate “Send Body” and select JSON as the content type.
After we have completed the operation & URL and then the authentication in the last steps, we now need to define what exactly is to be done.
To do this, we now define the request in JSON format based on the specifications in the OpenAI API documentation.
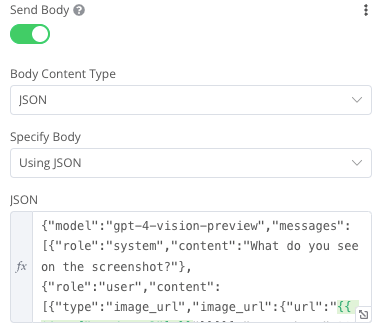
Below you can see what the finished request looks like:
The request consists of the following components:
model: Concretization of the model we want to use, in our case the vision model
messages: We can define in several parts what the input for our model should be. In our case, we provide the model with a general task in the form of a question via a system prompt. As a user prompt, we now insert our image in the form of the URL, in this case a variable that is then resolved as a URL by the input data. This image then takes the model and answers the question posed as a system prompt on its basis.
max_tokens: This determines the maximum number of tokens that the model may use to answer our query. We need to define the max_tokens param because the Visions API has a quite low default response token count.
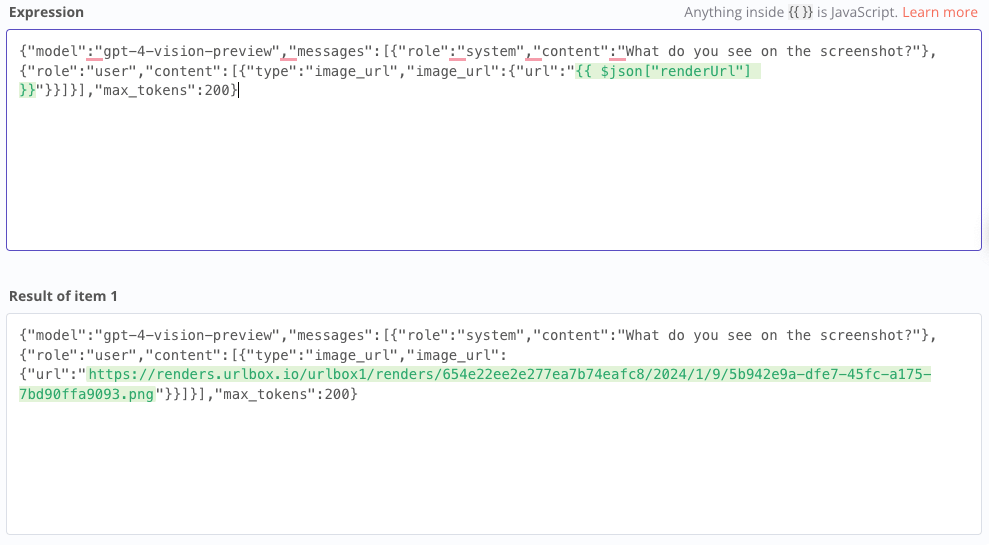
If you have built the workflow exactly as I did, you can copy the following JSON and paste it under Expression. You can then customize it according to your wishes. For example, if you want to use a static URL for testing, replace {{ $json[“renderUrl”] }} with your URL.
{"model":"gpt-4-vision-preview","messages":[{"role":"system","content":"What do you see on the screenshot?"},{"role":"user","content":[{"type":"image_url","image_url":{"url":"{{ $json["renderUrl"] }}"}}]}],"max_tokens":200}The Test Execution
If we now run our workflow, we should get an output that looks like this (excerpt).

In our case, the AI should describe the screenshot of the n8n website. If you have recreated the workflow, you should get a similar but not the same output due to the non-deterministic nature of the AI.
I hope you enjoyed this tutorial and were able to learn something about n8n, OpenAI and workflow automation.
If you still haven’t created an n8n account, you can now start a free trial.


Leave a comment