

Today we will show you how to synchronize a Google Sheets document with your Postgres database permanently. For this we use n8n cloud, an open-source node-based workflow automation tool. You can follow the steps below to run your first synchronization in just a few minutes.
Using n8n For Workflow Automation
To build our automation we use the software n8n. n8n is an open-source workflow automation software that is also available as a cloud version on the website of n8n in a free trial period.
It makes it super easy for anyone, with or without special technical knowledge, to build automations.
If you have never had any contact with n8n, you can get an overview of how to get started with n8n here.
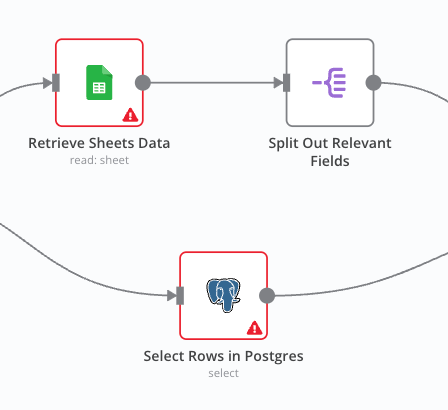
Overview of the Workflow
In our workflow, we want to retrieve the data from our Google Sheets table and our Postgres database, compare them and finally update the differences between the two in the Postgres database (or the Google Sheet).

Here you can easily copy the example workflow into your n8n account using the n8n template. This will make it easier for you to follow the steps below.
Defining the Trigger
As with every n8n workflow, we start with a trigger that defines when our workflow should be executed.
In our case, there are 2 basic ways to define this trigger. Either based on a fixed time interval or based on changes in the Postgres or our Google Sheets table (App Events).

Which one you should choose depends on your use case, basically:
- If permanent synchronization is important, choose the trigger based on the app events, or choose a very small time interval.
- If you only have a few actions in your applications or the data does not need to be permanently synchronized, choose a longer time interval.
Important: You can change the logic of the synchronization according to your wishes. With a little customization, this workflow works as a two-way sync. In the following example, however, we will concentrate on synchronizing changes in Excel to Postgres.
For our example, we use the On a Schedule trigger.
Retrieving the Data
The first step in our workflow logic is to query the data from our Excel and Postgres database.
Google Sheets
First, we retrieve the data from our Google Sheets via the n8n Google Sheets integration. To do this, you need to authenticate yourself with your credentials and then select the correct table or spreadsheet and the respective rows in the node.

Because the Google Docs integration always gives us the respective row of data as output, and we don’t need it for synchronization, we add a helper node after the data query, with which we split the relevant rows out.

The fields you split out here depend on the data you use for this workflow. The “Fields To Split Out” entered here are just an example.
Postgres
We now do exactly the same for our Postgres in order to compare the retrieved data in the next step.

As with the Google Sheets integration, you must first authenticate yourself with your credentials.
Here you can find instructions on how to set up your Postgres credentials.
Because we can specify which data we want to retrieve with our Postgres, we do not have to split out certain data afterwards.
Comparison
Now that we have retrieved our data, we need to find the difference between the data sets in order to synchronize them efficiently.
We could also skip this step by simply inserting the complete Google Sheet into Postgres each time, but this is very inefficient and resource-intensive when running this workflow frequently.
We use the n8n “Compare Datasets” node for the comparison.

As an example, we compare here using the first name.
This is usually not a sufficient comparison, as there may be several people with the same first name in data records. Ideally, you have a unique identification number in your data, or you compare across several stable factors (e.g. first name, surname & date of birth).
Since we see the Google Sheet data as the source of truth and want to adapt our Postgres accordingly, we use input A for differences, which in our case is the Google Sheets data.
Synchronization
The “Compare Datasets” node has various output strings. We are particularly interested in two.
- Data that exists in Google Sheets but not in our Postgres (“In A only Branch”)
- Data that exists differently in the two inputs (“Different Branch”)
Addition
We want to add data that is only available in Branch A, i.e. in Google Sheets, to our Postgres. So we connect this output string to a Postgres node with the “Insert” operation.

Connect to your Postgres database with the same credentials you used to query the data, select the correct table and either use the “Map Data Automatically” function or manually connect the data schema to the corresponding columns in Postgres.
Update
We now do exactly the same with the Data that exists differently in the two inputs, with the operation “Update”. Here is also an example of what the “Map Each Column Manually” function looks like.

This was the last step in our workflow. If you adapt this workflow to your data, you can now synchronize your Google Sheets and Postgres data as you wish.


Leave a comment