

Explore our detailed tutorial on implementing an automation workflow using n8n, triggers, HTTP nodes, and secure API authentication to automatically capture screenshots from any website. Follow us through each step from setting up your first n8n trigger, acquainting with the Urlbox API to running test executions, and creating your first automatic screenshot. Discover the world of automated website screenshot capturing with our comprehensive guide.
Getting Started With n8n
To build our automation, we use the open-source tool n8n in the cloud version. To follow along, you can either download the free open-source version here or start a free trial for the cloud version here.
If you need a little more guidance setting up your cloud account, you can follow this guide here.
The Urlbox Screenshot API

The second tool we will use is the urlbox screenshot API. There are many different providers of such APIs, so if you already have a subscription with another provider, you can also use this tool and simply adapt the following steps accordingly.
If you haven’t decided on a screenshot tool yet, I think urlbox could be a good and easy option for you. Also, urlbox offers a trial period, just click here.
Once you have both your accounts set up and ready, we can get started.
Setting Up Your Workflow – n8n Screenshots
Since everything in n8n takes place in so-called workflows, we first have to set this up. If you have just started your account, you are directly in a first, empty workspace and can get started.
If you already have an n8n account, create a new dedicated workspace for screenshot automation.
If you want to integrate the screenshot automation later as part of a larger automation, you can do this either by copying and pasting the nodes or also cross workflows using special triggers.
Using n8n Templates
Because n8n has a large active community and is committed to making it as easy as possible for newcomers, you can easily upload templates to your own n8n workspace via n8n’s online platform.
Some templates are free, and some, especially advanced ones, may cost money.

For today’s tutorial, I have created a free template at this link to make the following tutorial even easier to follow. Just click on the link and load it into your workspace, then you can continue.
Otherwise you can of course follow the tutorial without the template, it just makes it potentially a bit more difficult.
Translated with DeepL.com (free version)
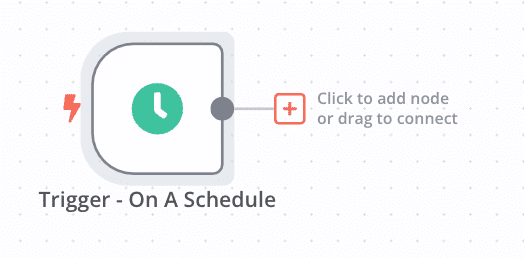
The Trigger
The starting point for n8n workflows is always a so-called trigger. For our purpose, we will select the “On a Schedule” trigger, but we will not go into detail on how to define a trigger.
If you want more information about triggers, click here.
If you don’t want to run your workflow “On a Schedule” but want to use a different trigger, you can get an overview of the other trigger types here.

The HTTP Node
To request REST APIs via n8n, we use the HTTP request node. We select this as the second node by clicking on the small + to the right of our trigger node and searching for HTTP.
Basics
In our HTTP request node, we now can make all variations of API calls that are possible with the respective API. To get a more detailed insight into what is possible, let’s take a look at the documentation of the API provider, in this case, Urlbox.

As we can see here, if we want to take a new screenshot, it is a POST interaction with the API behind the URL “https://api.urlbox.io/v1/render/sync”. Of course, by the time you read this, the API may have changed, so it’s best to check the documentation.

To avoid having to enter all the fields manually in n8n, there is the “import cURL” function. We can simply copy the example code on the right from the documentation, click on import cURL in the HTTP request node, and copy the code in.
After we have clicked on Import, our node should be filled in with the example parameters. In the next steps, we only need to modify these for our purposes.

Authentication
If we work our way down from the top, the first thing we need to change is authentication. In order to use the API, we need our own API key, which we receive when we have registered with Urlbox.
To do this, simply navigate to urlbox, click on Settings on the left sidebar, and copy the “Secret Key”. We then use this key to replace the text “YOUR_URLBOX_SECRET” in the header parameter value field after the word “Bearer”.

If you use the whole thing in production and share the account with several people, you should set up proper secret management, but for our test purpose, it is sufficient to simply copy the API key here.
Configuring the API Call
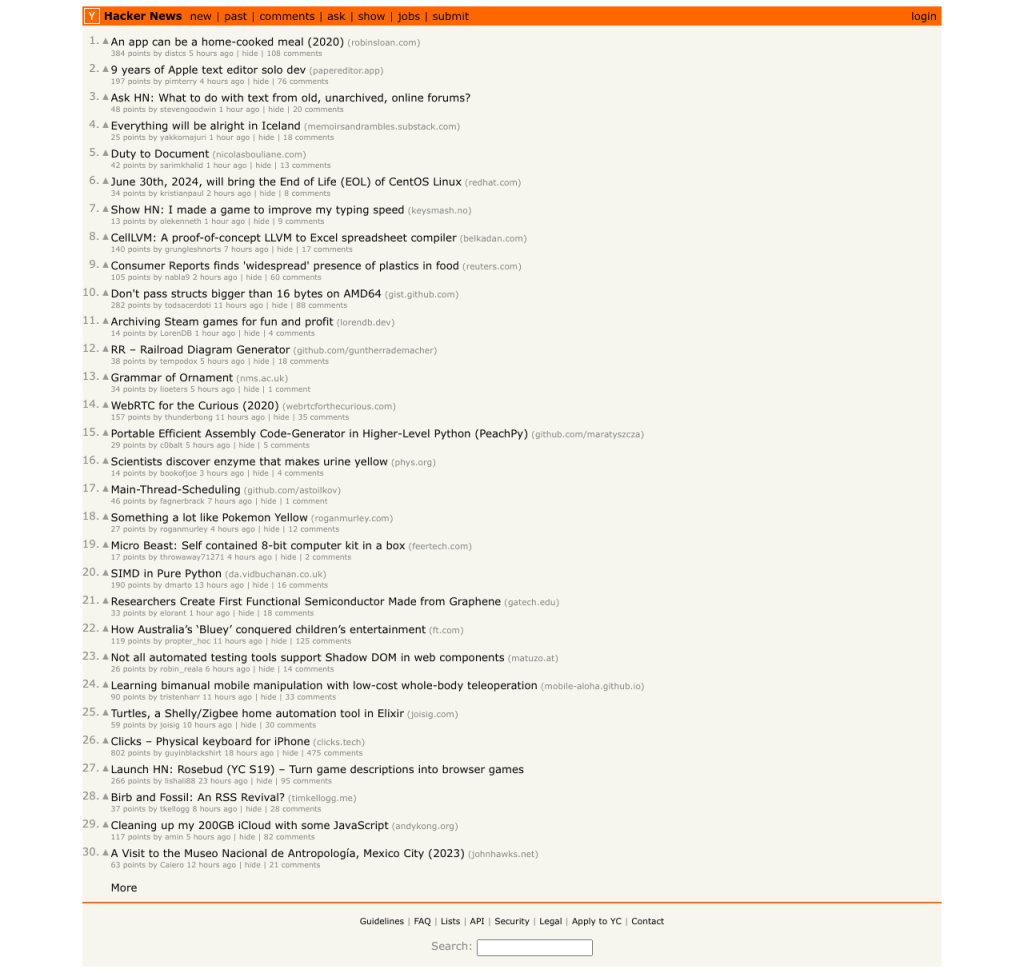
The last step is to adjust the body parameters to our requirements. The Sanbox from urlbox, which you can click through, helps us to do this. For this example I will try to take a full page screenshot of the front page of Hackernews.

After I have found the correct parameters via the sandbox, I now set these as body parameters in the HTTP request node and delete the unused parameters from the default settings.

Now we are ready for our first test execution.
Test Execution
To try out our workflow, click on Execute Node at the top right of the HTTP Request Node. If you have filled in all fields correctly, you will receive an output consisting of (usually) 2 fields, a link where you can view and download your screenshot and an indication of the size of your screenshot.
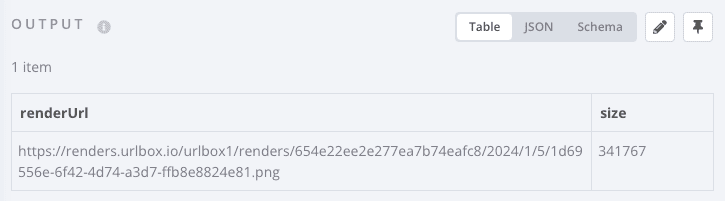
If we now copy the link and enter it in our browser, we will see our screenshot. Here is the picture taken by my test execution.
That was the short tutorial on n8n and urlbox. In addition to what I have shown here, there are many other possibilities using the two tools, such as using another n8n workflow to do something with the image, or saving the images taken directly to your own S3 memory. Have fun trying it out.


Leave a comment