
Immerse yourself in n8n Cloud’s universe with this concise guide, helping you leverage its full potential. From swift sign-up to your first actions, optimize your workflow automation with step-by-step tips, regardless of your experience level. Tread the path towards enhanced productivity with n8n Cloud today
What is n8n cloud?
n8n is a robust, no-code workflow automation tool, developed to ease both tech-savvy and non-tech users into setting up their automated systems.
Its main strength comes from allowing seamless integration of various online services – all without requiring any coding knowledge. By simplifying workflow management and connecting disparate applications, n8n serves as your gateway into efficient automation, effectively unlocking a world of productivity and operational ease.
If you already have a n8n cloud account set up & ready to go, click here
Free Trial & First Steps with n8n cloud
Even though n8n offers an open-source version that you can host yourself, in this article we will focus on setting up and getting started with the cloud version of n8n.
As a first step open the n8n homepage. To follow along, start by clicking on “Get Started” in the top right corner. Afterward, you will be sent to the Registration page, where you will need to enter your name, an e-mail address, a password, and a name for your workspace.

If n8n asks you to pick either the n8n Standard version or the n8n with Langchain version, pick n8n Standard. We will go into detail for n8n with Langchain in another tutorial.
After filling out a quick form and choosing one or more applications you used before, to help n8n set up your account, you are ready to go.
Your First Workspace in n8n cloud
After signing up you will be sent straight into your first (empty) workspace. As n8n offers a lot of different possibilities, it can be quite confusing. Therefore we will move through the main functions in the following.
The Sidebar
On the left side of your screen, you can expand the sidebar. It is the place to navigate into other places in n8n, outside of the workspace we are in.
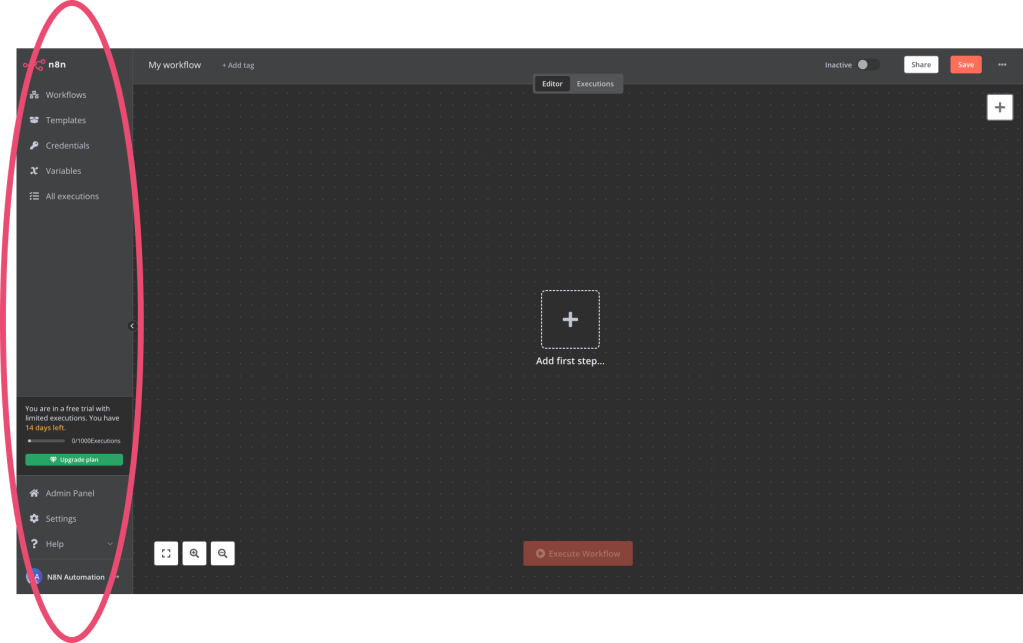
Workflows: Present an overview of the structured processes you’ve built. Think of workflows as projects or repositories.
Templates: Offer a wide variety of pre-made systems created by both n8n and our thriving user community, ready for your use.
Credentials: Allow for the secure set-up of authentication parameters for external services, enabling n8n to interact within your workflows.
Variables: Provide the functionality to create and maintain global variables for versatile use across your different n8n workflows.
All executions: Display a comprehensive list of run instances for all your workflows, available at a glance within your n8n account.
Navigation Bar
On the top of the workflow, you can see the navigation bar. It is the place to make high-level changes to your workflow.

My Workflow Name: Change your workflow’s name by clicking on “My workflow” the initial & default name of your first workflow.
+ Add tag: Give your workflow tags, to be able to filter your workflows later. Especially important if you run a lot of them.
Editor/Executions: Change between editor & execution view. In the editor view, you can change your workflow. In the execution view, you can see the executions of this particular workflow.
Inactive/Active: You can turn your workflow off and on.
Share: Make it possible for your team members to work together on one workflow.
Save: Make sure to always save the changes to your workflow.
The Workflow Canvas
Now we are ready to move to the centerpiece of n8n, and the place where you will spend most of your time, the workflow canvas.

On the bottom left you can change to full screen and zoom in and out.
You can either press the plus in the middle of the canvas or the one on the top left to get started with the first node in your workflow. Node is the name for the elements of a workflow in n8n.
The Trigger

Before you can dive into defining the logic of what your workflow will do, you need to choose a trigger for your workflow.
The trigger is the start node of your workflow. It defines when and how often your workflow will start running. There are several ways to define this trigger like “On app event” for example if a row is added to your Airtable, On a schedule, to run a workflow every day at the same time or manually. We will do a deep dive into n8n triggers in another article.
To move forward we will pick the trigger “Manually”.

Congrats! Now you created your first starting node in n8n. To create the first action of the workflow, click on the +.
Workflow Building in n8n
You are now set up to start building whatever workflow you want. As we cannot go into every detail about every one of your potential next steps, the following will just be an overview of the categories of nodes you can now choose from.

Action in an app: n8n can perform actions in other applications, outside of n8n, that you provided authentication for. As an example, you can make n8n create a task in Asana.
Data transformation: Modify data in any way you like, using pre-built time-modification methods or custom JS or Python code for the ones more tech-savvy.
Helpers: Pre-built no-code helper functions for you to call APIs, get HTML code from public websites, and much more.
Flow: create unique workflows by making IF/ELSE decisions based on your nodes output or merge data from different sources together.
Files: Work with and create different kinds of files like images or spreadsheets.
Now it’s your turn to try out all of the different nodes in n8n and build your first workflow. If you want some guidance, see here how you can build your first workflow, calling an API to get your local weather data in real-time.


Leave a comment